The heater in this repair was an RVMP Flex Temp on-demand propane water heater installed in a Brinkley Model Z fifth wheel. Access to the back of the appliance was available through a storage compartment, which made the water, gas and electrical connections easier to reach than they are in some RVs.
The broad sequence is familiar on many RV tankless water heaters: isolate every energy source, remove the exterior flange screws, disconnect the services from behind, release the old butyl seal, slide the appliance out, prepare the opening, install the replacement and then perform complete water, LP-gas and operating tests. The details are not universal. Cutout size, vent clearances, gas fittings, wire colors, controller wiring and startup procedures can change by model.
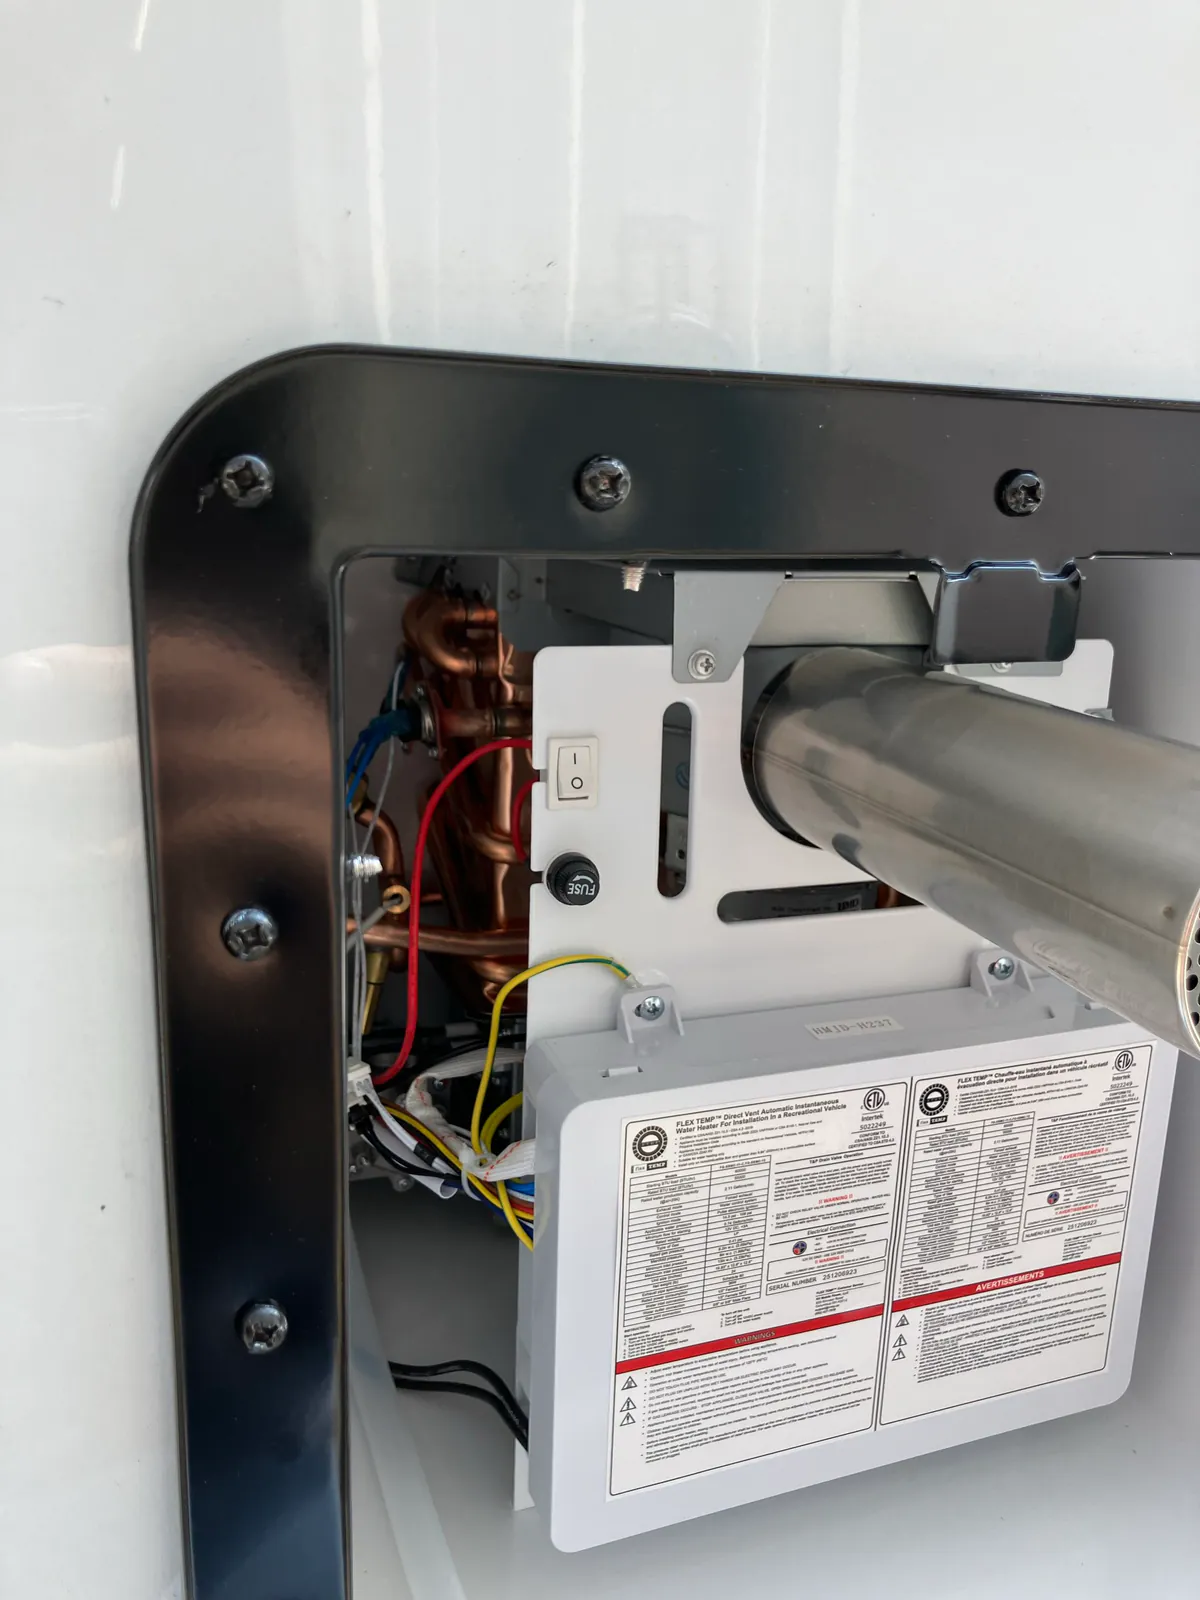
What was specific to this Brinkley repair?
| Item | What this installation used |
|---|---|
| RV | Brinkley Model Z fifth wheel |
| Water heater | RVMP Flex Temp on-demand LP-gas water heater |
| Rear access | Interior storage-compartment opening beside the appliance |
| Water connections | Red hot-water and blue cold-water PEX lines with service valves and swivel fittings |
| Electrical connections | 12-volt DC power and wall-controller wiring |
| Weather seal | Continuous butyl tape behind the exterior flange |
Before ordering a replacement, read the old heater's data plate and compare the exact model to the replacement instructions. A black door or similar-looking flange does not prove that another heater will fit or that its utilities will line up.
Before removal: identify and isolate everything
A professional installation starts before the first screw is removed. Photograph the old unit's data plate, exterior door, rear plumbing, LP line, wire splices and controller connections. Record which water line is hot and which is cold, the 12-volt polarity and how the wires are protected from heat and sharp edges.
- Turn the water heater and wall controller off.
- Disconnect shore power and disable the 12-volt source feeding the heater.
- Close the LP-gas supply at the source.
- Disconnect city water and turn off the water pump.
- Allow the appliance and water to cool, then open a hot-water faucet to relieve pressure.
- Protect the storage area from any water left in the heater or lines.
Step 1: Remove the exterior flange screws
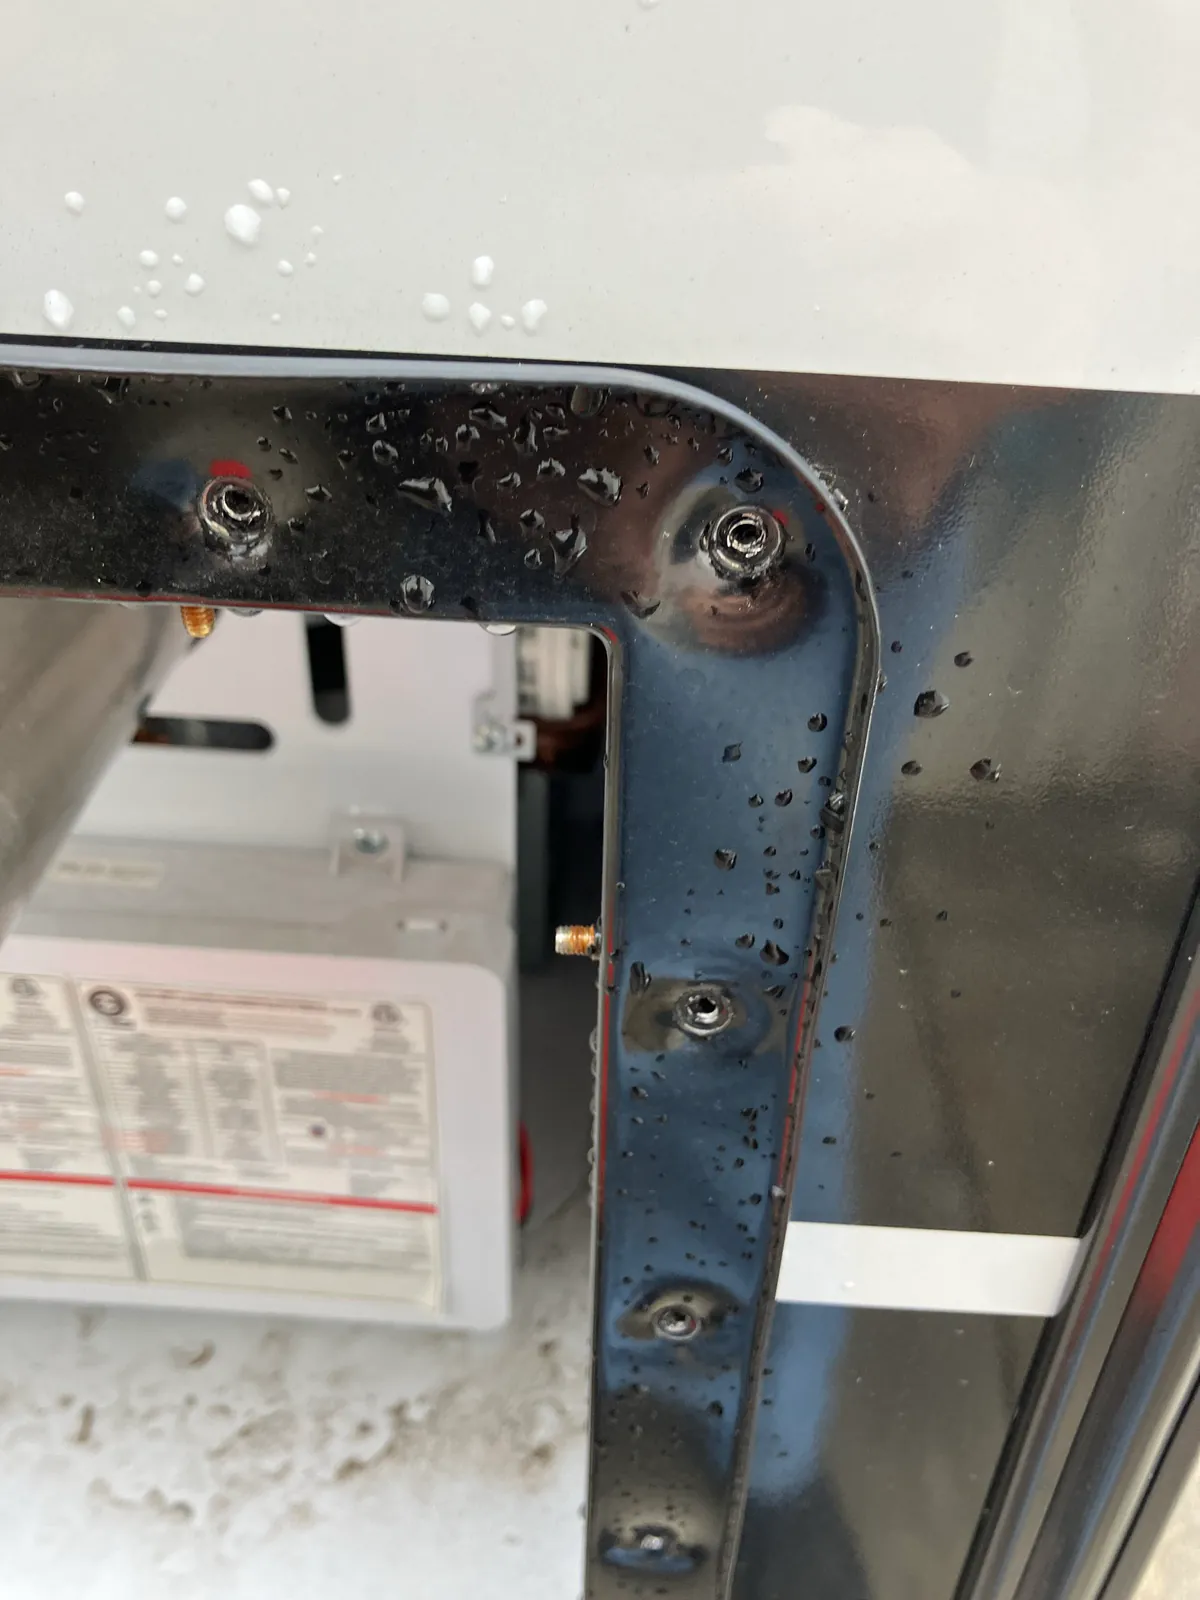
Open the exterior service door and remove the screws around the perimeter of the mounting flange. Support the appliance before the last fasteners come out. The old butyl tape may still hold it firmly, but it should not be trusted to carry the heater's weight.
Inspect every screw as it comes out. Rust, a stripped hole, wet wood fibers or dark residue can point to a water-sealing problem that needs correction before the replacement is installed.
Step 2: Open the rear access and document the connections
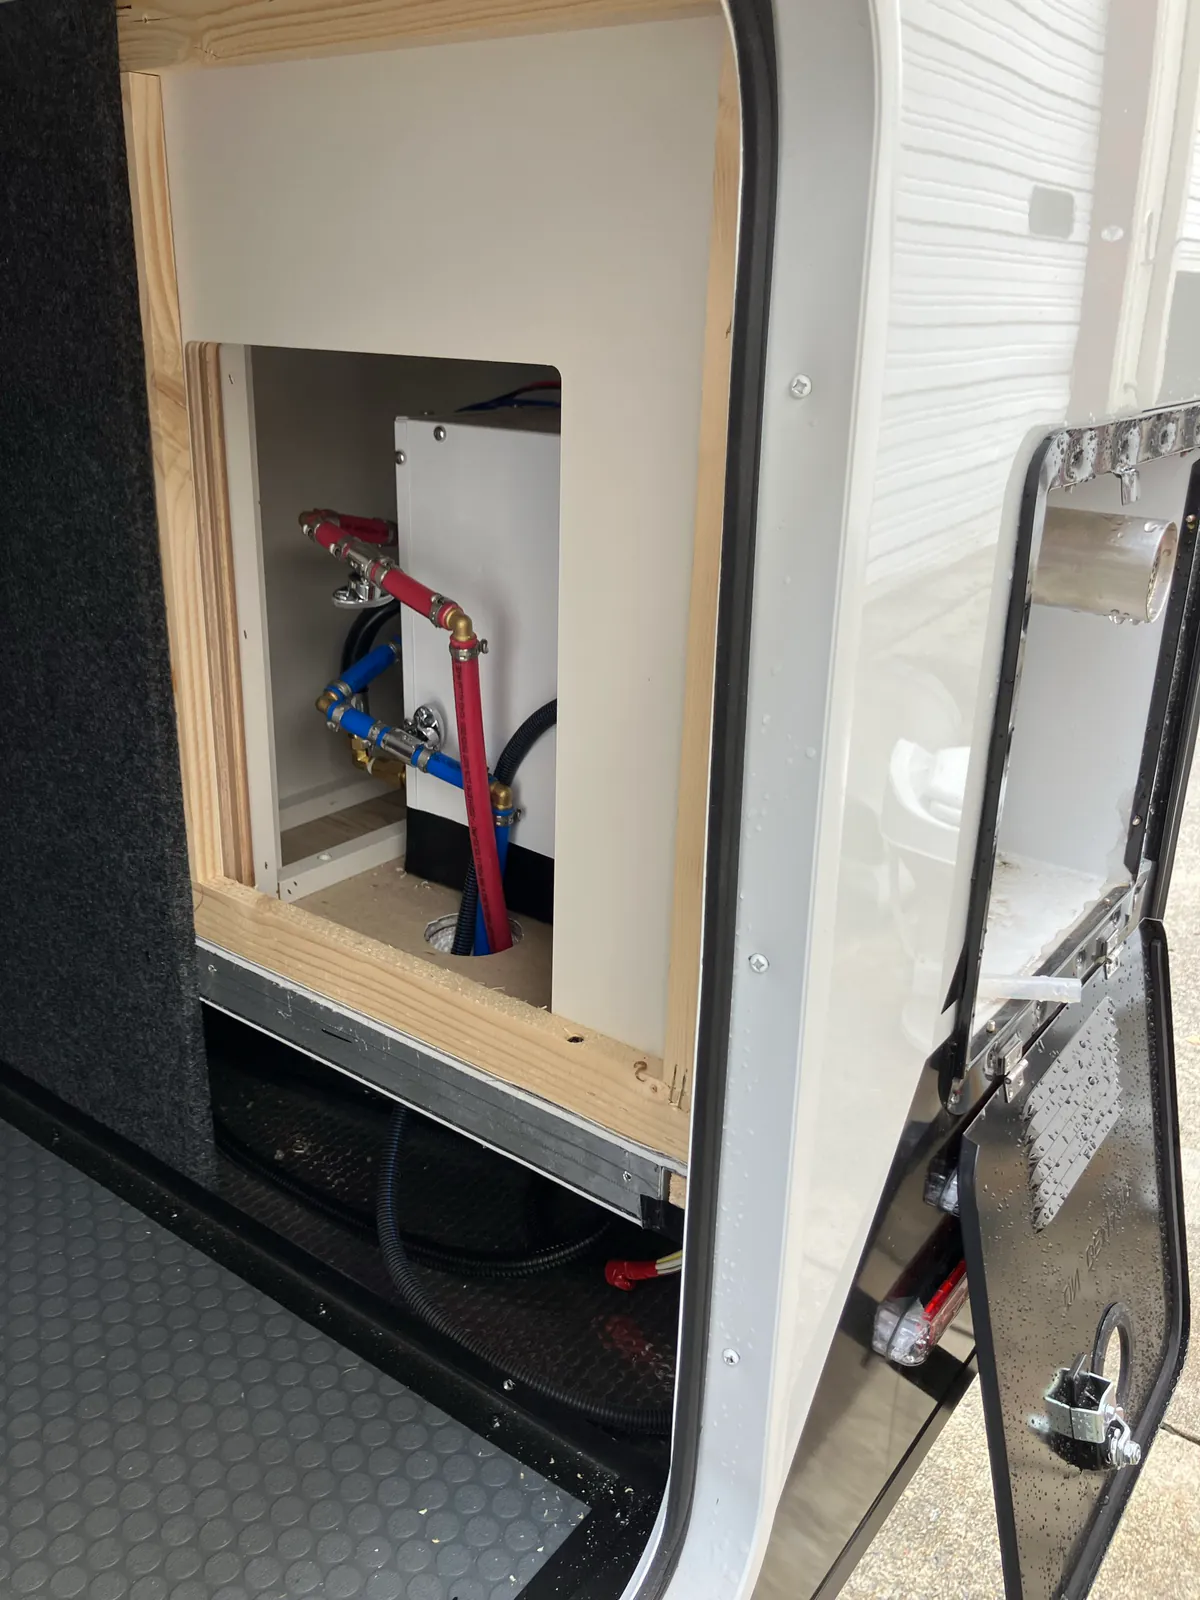
Use the interior access to verify that every line has enough room to disconnect without twisting or loading a fitting. Mark connections before moving them. The RVMP Flex Temp manual identifies red as 12-volt positive and black as negative; its two blue controller wires are not polarity-sensitive. That information applies to this product family, not to every tankless heater.
Look for rubbed wire insulation, unsupported PEX, loose clamps, heat damage, evidence of condensation or water staining. Replacement is the best time to correct routing that could chafe or place side load on a connection.
Step 3: Disconnect water, wiring and LP gas
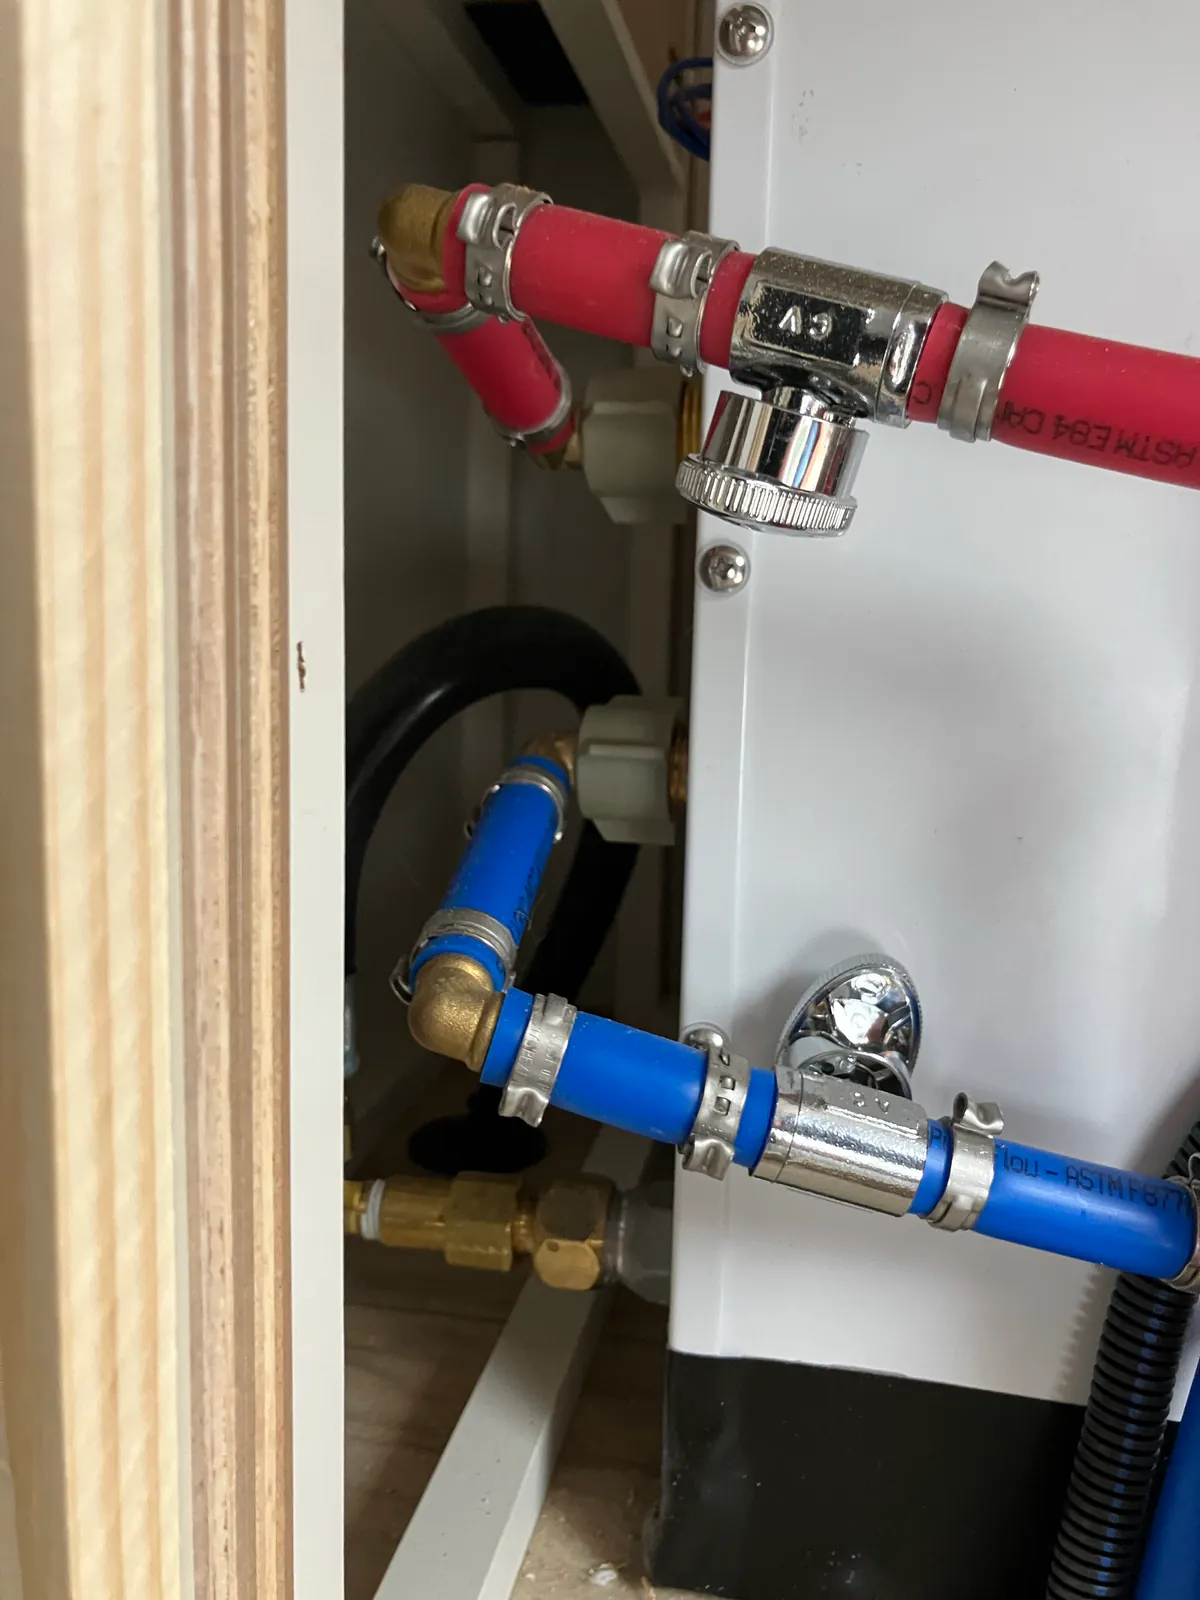
With pressure relieved, place an absorbent towel below the fittings and disconnect the hot and cold water lines. Hold the appliance fitting with the proper backup wrench when the design calls for it, and do not let a PEX elbow or valve carry the turning force.
Disconnect the 12-volt supply and controller wiring only after power is confirmed off. Cap or isolate conductors so they cannot touch each other or the RV structure.
The LP connection should be disconnected by qualified personnel using the correct tools and fitting procedure. Keep dirt and sealing debris out of the open gas line and appliance inlet. Do not assume pipe sealant belongs on every gas fitting: flare seats, NPT threads and manufacturer-supplied adapters are sealed differently.
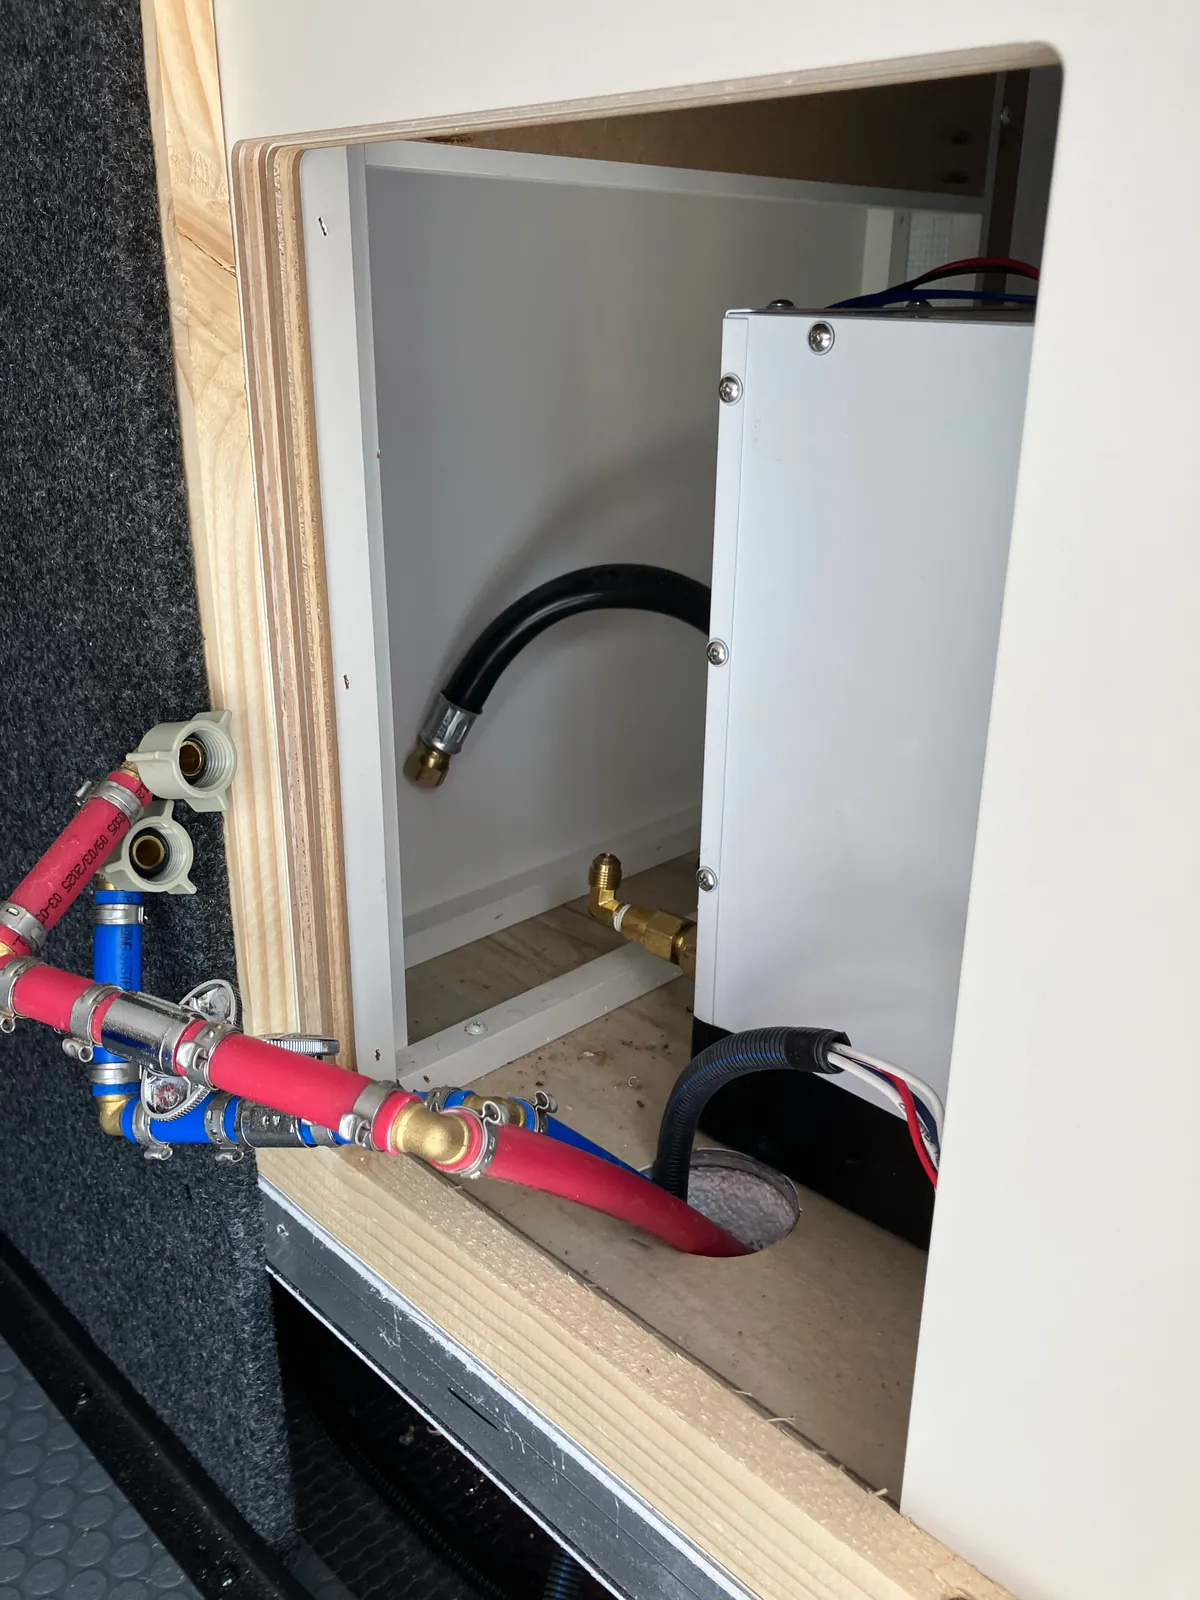
Step 4: Release the old seal and slide the heater out
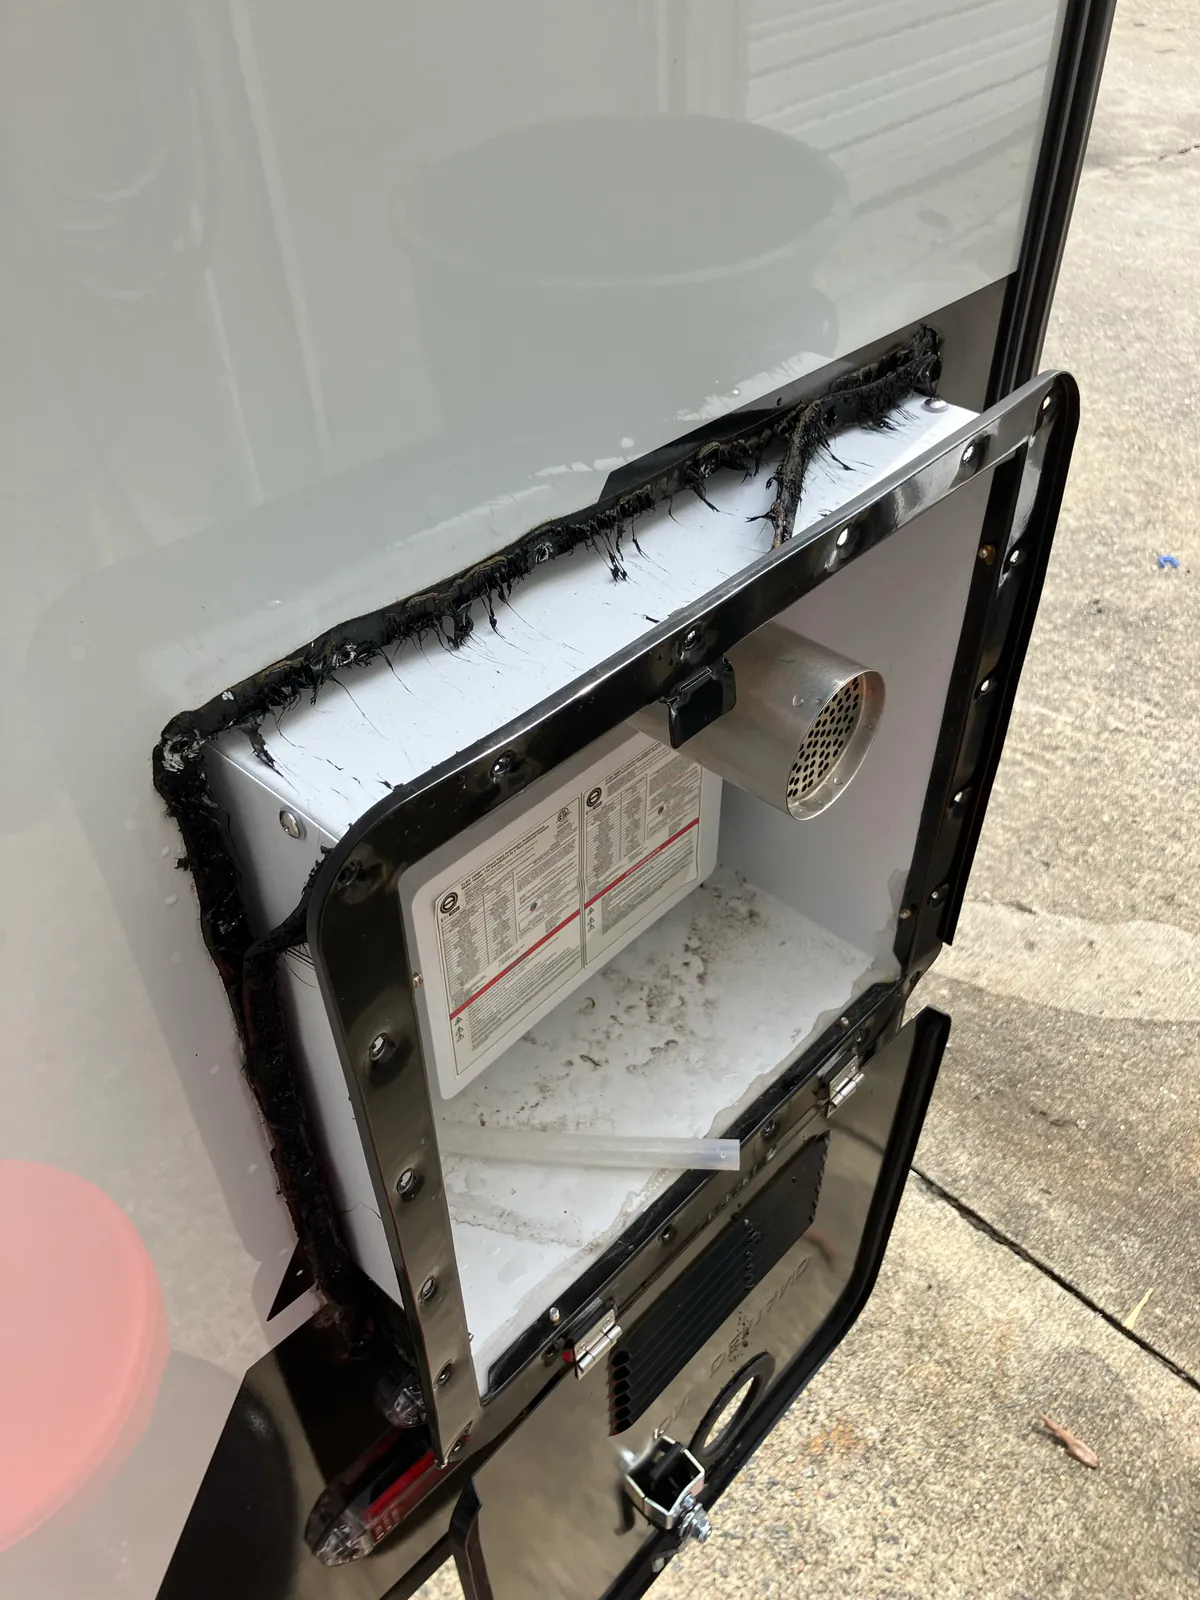
Use a non-damaging trim tool where practical and work around the flange a little at a time. Avoid levering hard against the thin RV sidewall. A helper inside can guide the wires and plumbing while the installer outside supports the heater and pulls it straight out.
Stop if a line is still attached, the unit binds in the opening or the exterior skin starts to flex. Forcing the box can tear wiring, kink a gas line or enlarge the wall cutout.
Step 5: Clean and inspect the opening
Remove the old butyl and loose sealant from the wall and flange area without gouging the gelcoat or painted surface. Clean to a sound, dry surface that the new water seal can contact.
Before the opening is covered again, inspect:
- The sidewall and lower sill for moisture, swelling, soft wood or delamination
- The cutout dimensions and squareness against the replacement requirements
- Framing and screw locations for enough material to hold fasteners
- The compartment floor for signs of a past plumbing or flange leak
- LP line, water lines and wiring for abrasion, heat exposure or strain
- The exterior area around the exhaust for required clearances and damage
Water damage or a distorted opening should be repaired before the new appliance is used to hide it.
Step 6: Dry-fit the replacement
Set the replacement into the opening without final sealing and confirm that the flange can sit flat, the exhaust is oriented correctly and the service connections are reachable. Verify that hoses and wires will not be pinched behind the housing.
Do not make a different heater fit by forcing the flange, drilling unexplained openings or changing combustion clearances. If model compatibility, gas capacity, cutout size or vent location is uncertain, stop and confirm with the appliance and RV manufacturers.
Step 7: Apply a continuous butyl-tape seal
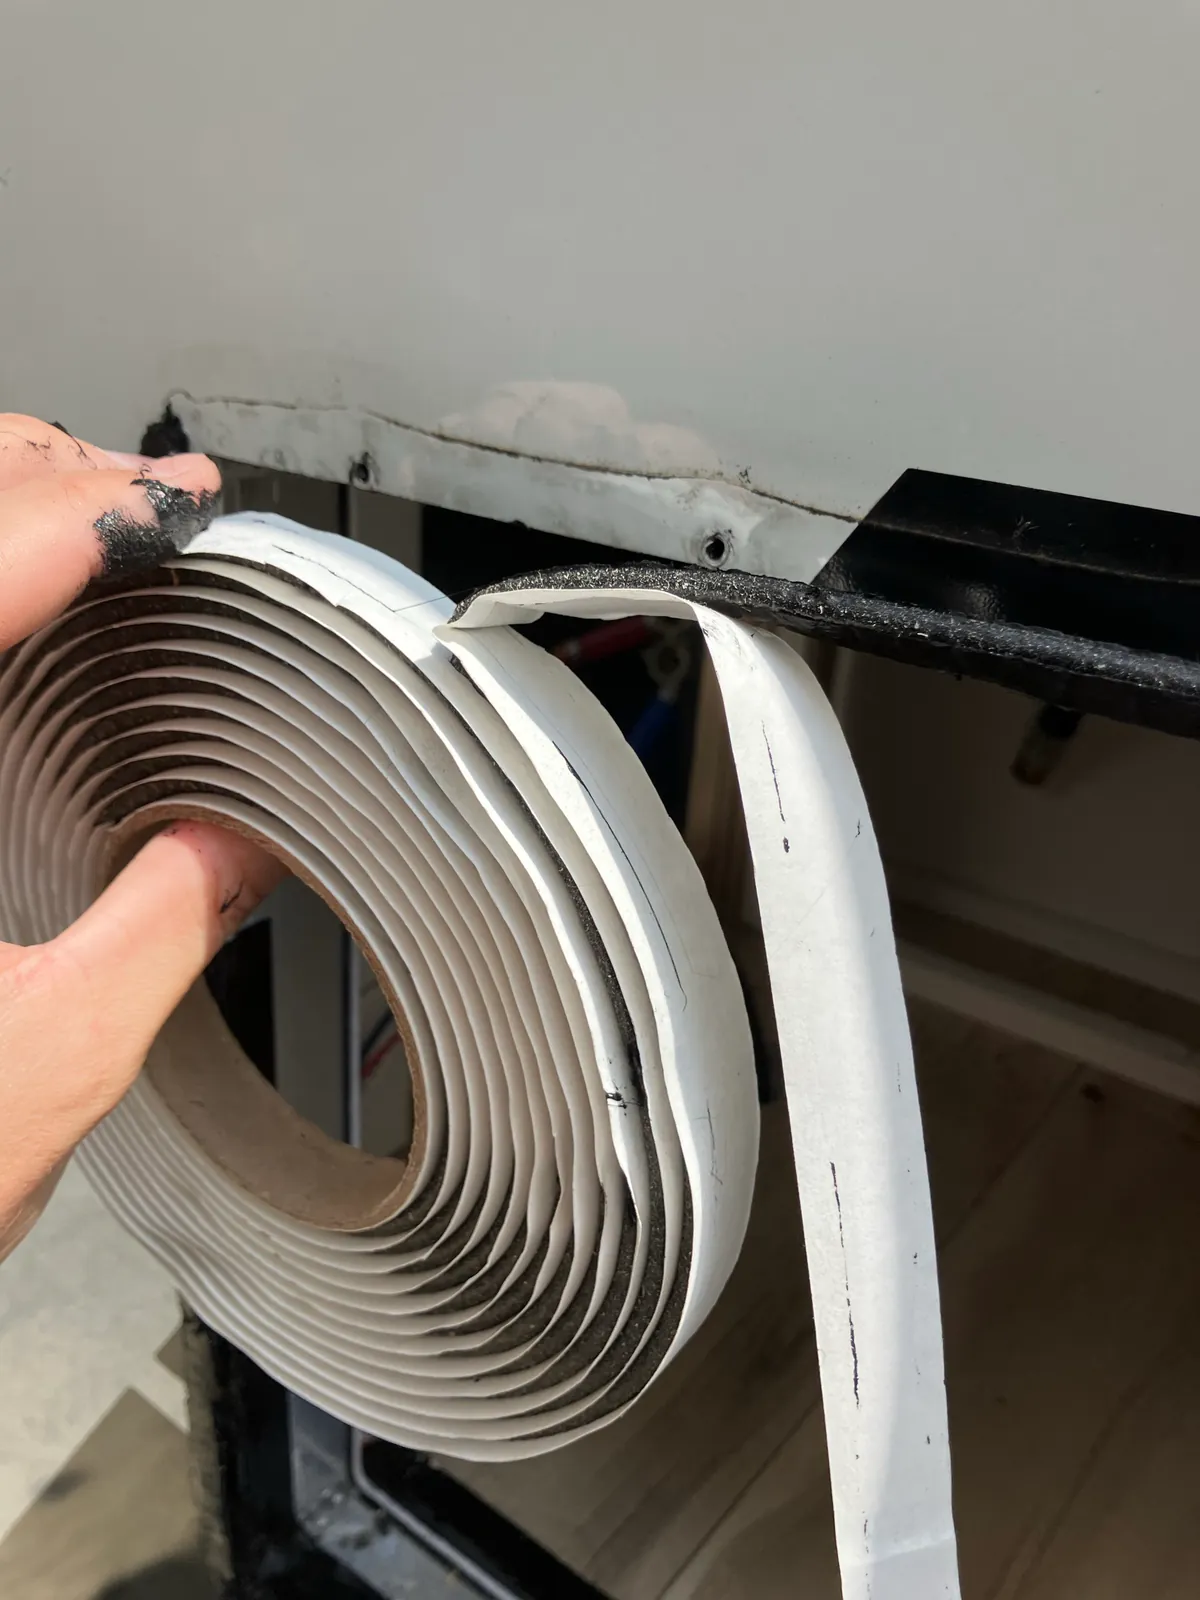
For this RVMP Flex Temp, the manual calls for adequate water-sealing material such as 1-inch-wide butyl tape around the entire back of the front flange and its holes. The same manual says not to use an adhesive sealing material such as silicone as the watertight seal behind the flange.
Run the tape continuously and overlap or join the ends without leaving a drainage path into the wall. Keep the tape clean. Dirt, stretched-thin sections and gaps around corners can create a leak even when the flange looks tight from the outside.
Step 8: Seat and secure the new heater
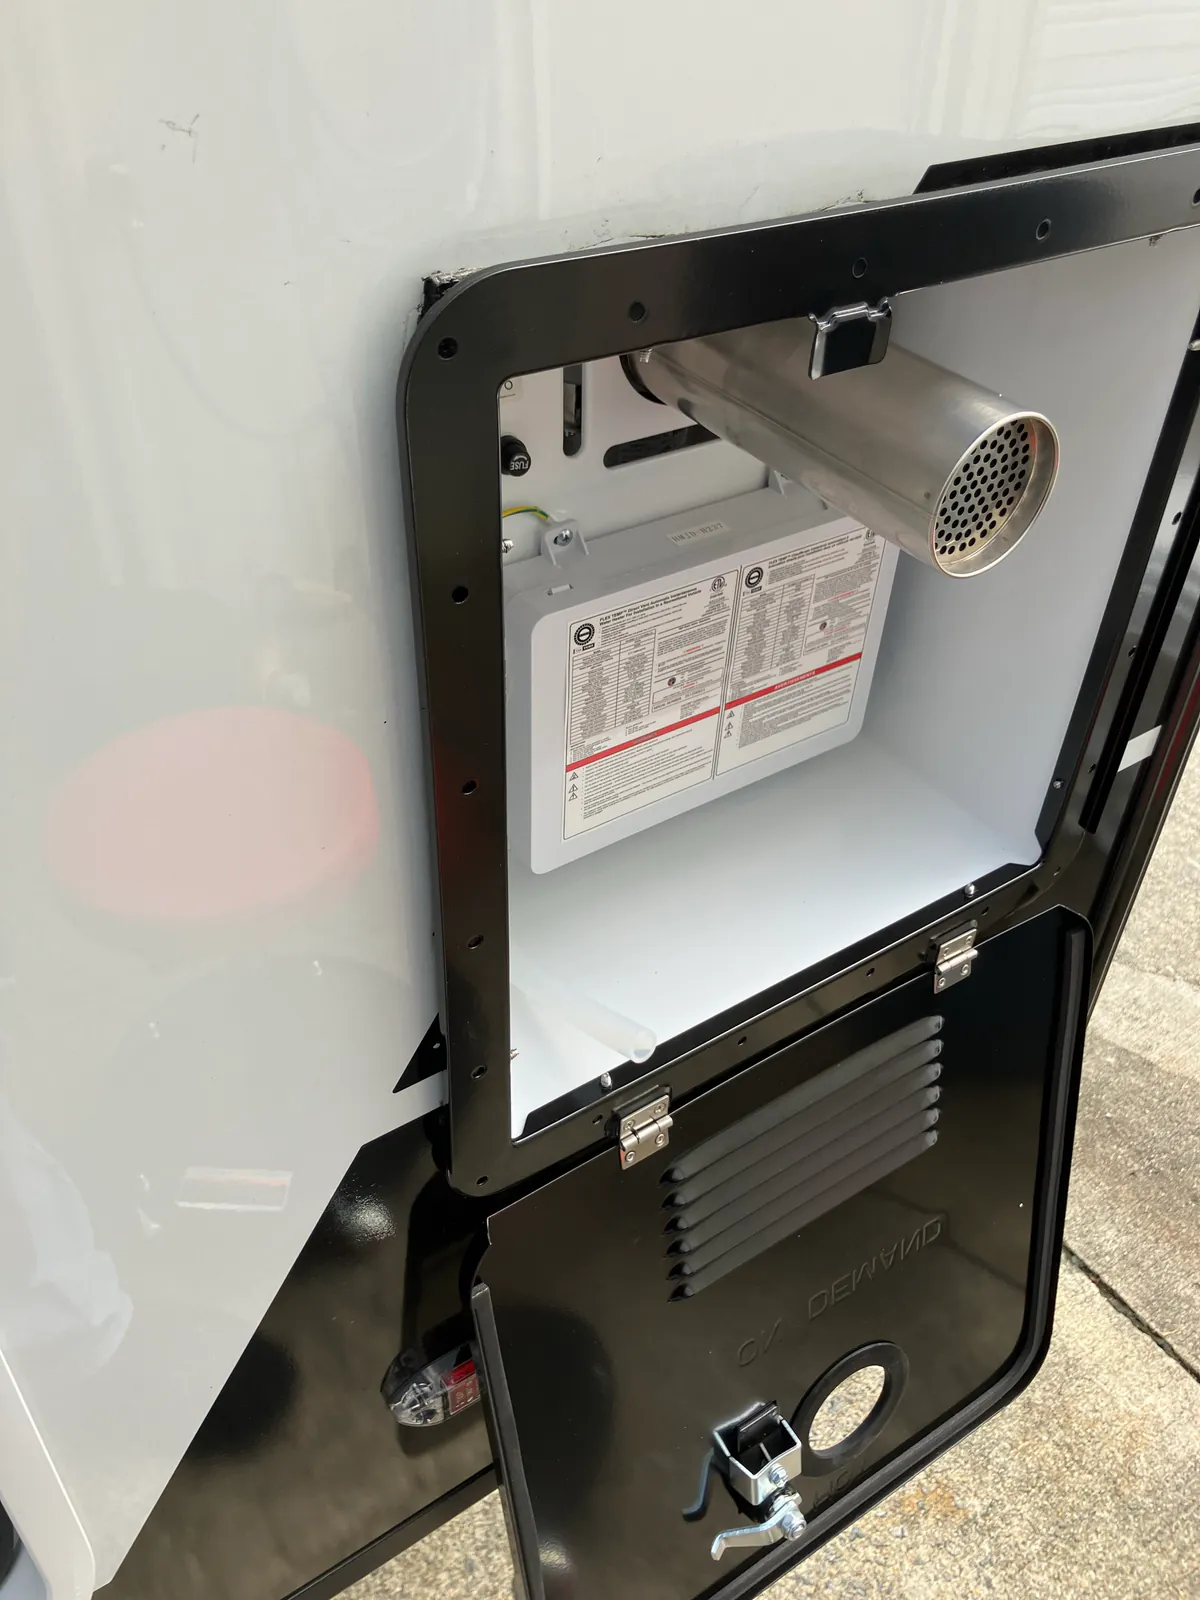
Slide the heater into the cutout until the flange contacts the RV sidewall. Start corrosion-resistant fasteners by hand and tighten them in a balanced pattern so the flange draws in evenly. The goal is a consistent butyl compression, not a bowed flange or stripped wall material.
Trim only the excess butyl that squeezes out after the flange is secure. Follow the exact manual for any perimeter finishing sealant and leave any intended drainage points open.
Step 9: Reconnect the services without putting them in a bind
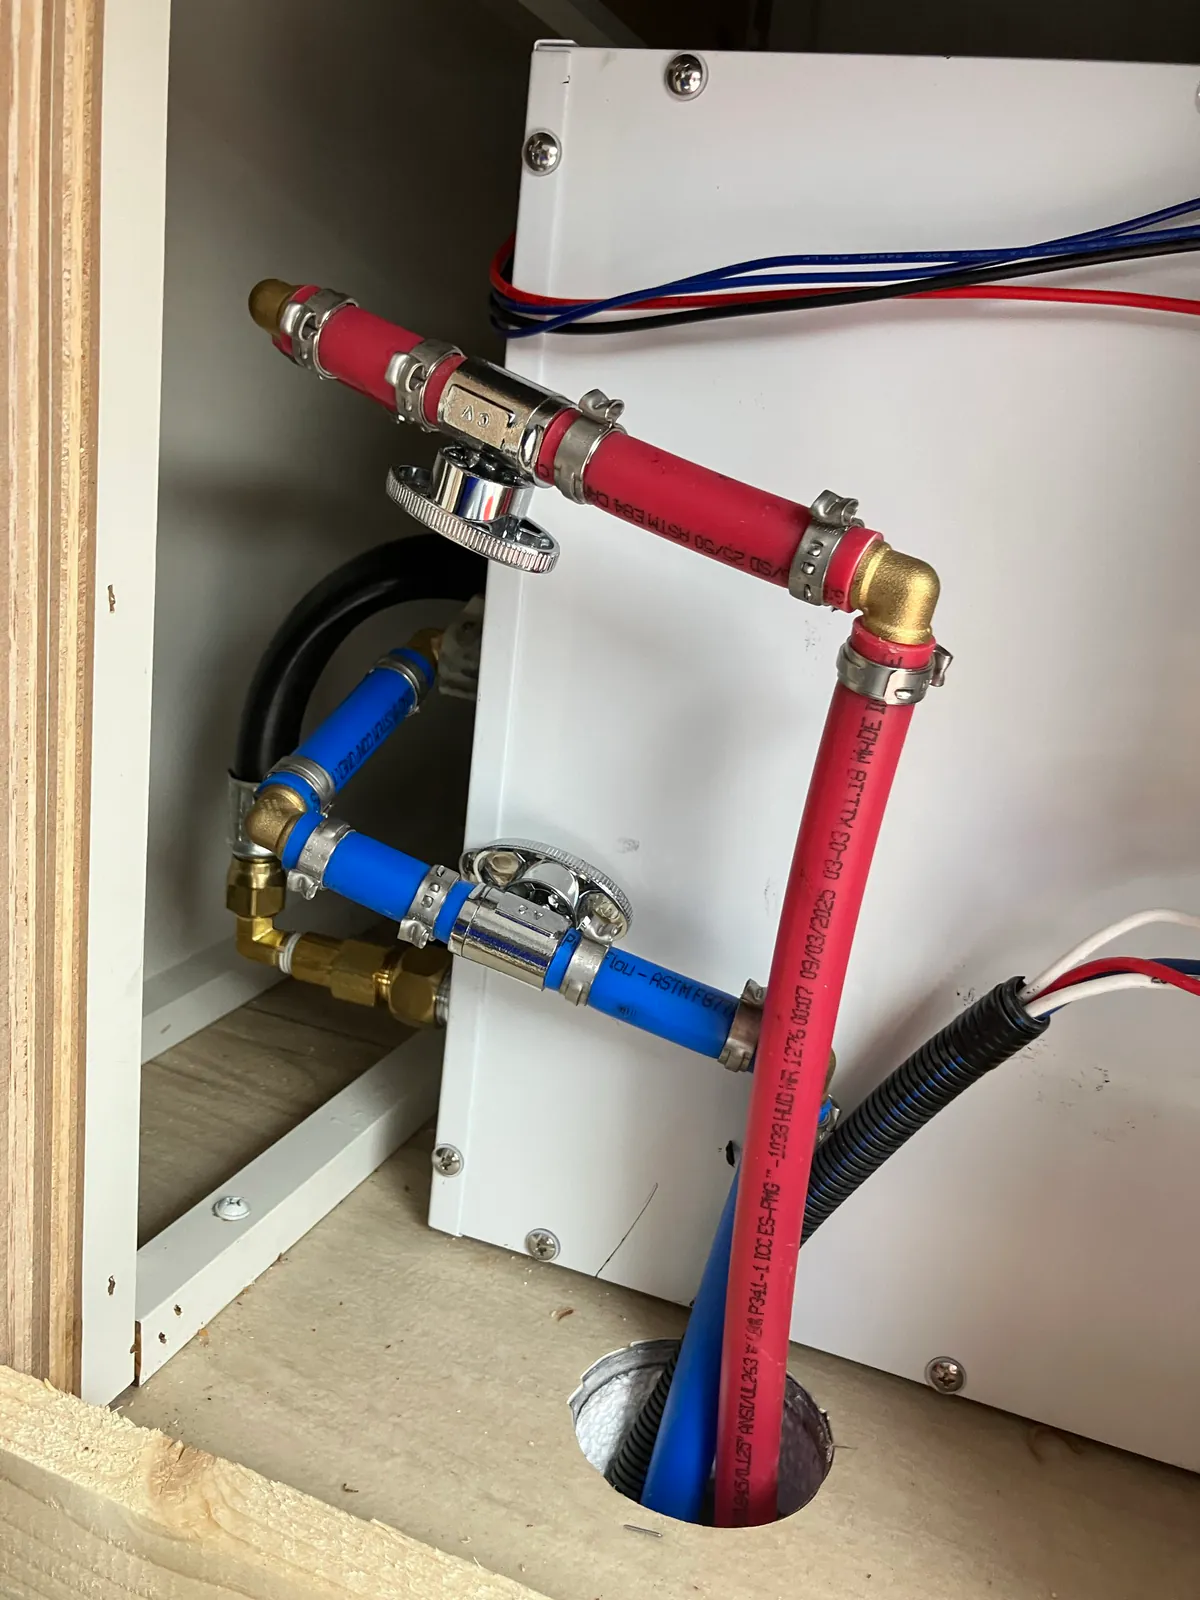
Reconnect the hot and cold water fittings without overtightening. Make sure each swivel fitting is square and its sealing washer or approved seal is correctly positioned. A fitting that starts crooked may feel tight while still leaking.
Reconnect 12-volt power and controller wires according to the model diagram, keeping power off until the leak checks are ready. Protect splices, restore loom and clamps, and keep wiring away from hot or sharp components.
Qualified personnel should reconnect the LP service line using the approved fitting method. The line must not support its own weight from the appliance inlet, rub against the housing or be stressed by the access panel.
Step 10: Perform water and gas leak tests
Do not turn the burner on immediately. The RVMP sequence checks the water system and LP-gas system before functional testing.
| Test | What to verify |
|---|---|
| Water fill | Keep the heater switch off, turn the water supply on, open faucets until flow is smooth and air is purged, then inspect every water connection by sight and touch. |
| LP leak check | Use approved leak-detection liquid or an equivalent method on every disturbed gas connection. Bubbles indicate a leak that must be repaired. Never use a match, lighter or other flame. |
| Gas pressure | Qualified personnel verify that test pressure stays within the appliance limit and that operating supply pressure matches the data plate and manual. |
| Exterior seal | Confirm even flange contact, sealed fastener holes and no gaps in the perimeter weather seal. |
Step 11: Commission the heater
Only after the water and gas leak tests pass should power and fuel be restored for a functional test. For the Flex Temp, confirm steady water flow with no trapped air, power the unit and controller, set a safe outlet temperature, turn on the LP supply and fully open a hot faucet so the heater sees enough flow to ignite.
During the first complete heat cycle, verify:
- The controller powers up without an error code
- The fan starts and airflow at the exterior vent is unobstructed
- The burner ignites only when adequate hot-water flow is present
- Water warms steadily without surging between hot and cold
- No water or LP leaks appear as fittings warm
- The burner shuts off when the faucet closes and the fan completes its cooldown
- The exhaust area remains clear of people, gear and combustible material
Recheck the rear connections after the heat cycle, then secure the interior access panel. Test the water temperature at the faucet before use; a tankless heater can deliver scalding water when its control, flow or mixing setup is wrong.
Common mistakes that turn this into a comeback repair
- Ordering by appearance: Similar doors can hide different cutouts, depths, connections and controls.
- Using silicone as the flange bedding: The Flex Temp instructions call for butyl-type water sealing behind the entire flange and specifically reject adhesive sealant as that primary watertight seal.
- Pulling before every line is free: A hidden wire or gas connection can be damaged when the appliance is forced outward.
- Overtightening fittings: More torque can distort a swivel seal, crack a fitting or damage the heater connection.
- Skipping the loaded gas-pressure check: A heater can light and still have an unsafe or inadequate fuel-supply condition.
- Testing with only a trickle of water: Tankless heaters require minimum flow before ignition.
- Closing the access before retesting: Connections should be inspected again after water pressure and a complete heat cycle.
When to stop and call a qualified RV technician
Stop if the exact replacement cannot be confirmed, the LP fitting type is uncertain, the line or regulator shows damage, the wall opening is wet or structurally weak, the exhaust clearance is questionable, wiring colors do not match the diagram, gas pressure cannot be measured, a leak returns after adjustment or the heater shows an ignition or combustion fault.
A tankless heater is not only a plumbing appliance. It is also an LP-gas burner and direct-vent combustion appliance attached to an exterior wall. Correct installation protects the RV from fire, carbon monoxide, water intrusion and freeze damage.
FAQ
Can I replace an RV tankless water heater myself?
The RVMP manual requires a qualified installer, service agency or gas supplier. An owner may be able to inspect the model label or locate access, but the LP connection, pressure verification, leak testing and combustion-appliance commissioning should not be improvised.
What kind of tape seals an RV water heater flange?
It is called butyl tape. RVMP specifies a continuous layer of water-sealing material such as 1-inch butyl tape behind the whole front flange and fastener holes. Follow the manual for the exact heater because other products can specify a different seal system.
Are all RV tankless water heaters the same size?
No. Compare the complete model number, wall cutout, mounting depth, exterior door, vent clearances, water and gas connections, 12-volt demand and controller. A similar-looking unit is not automatically a safe drop-in replacement.
Should the water system be filled before the heater is fired?
Yes. The water supply should be turned on, the air purged through open faucets and all water connections checked before functional testing. The heater also needs steady flow to operate correctly.
How do I check an RV propane connection for leaks?
Use approved leak-detection liquid or an equivalent professional method and follow the appliance pressure limits. Never use a flame. Because this test follows a disturbed LP connection, it belongs with qualified service.
Related tankless water-heater help
- RV water heater has no hot water
- Girard tankless RV water heater has no hot water
- Furrion tankless water heater error codes
- Suburban IW60 tankless water heater will not ignite
- Truma AquaGo has no hot water
- RV propane regulator diagnosis and safety
- How to find a hidden RV plumbing leak
Sources and repair notes
The photographs document an actual RVMP Flex Temp replacement on a Brinkley Model Z. Exact access, hose routing, fittings, controls and clearances vary by year, floorplan and appliance model. Product instructions were reviewed July 27, 2026.
Diagnosing a water heater before replacement?
Start with the exact symptom. The guided troubleshooter separates water-flow, 12-volt, propane and ignition problems before parts are ordered.
Start water-heater diagnosisFind RV service